Shared Channels in Teams
Teams

The new Shared Channels function In Teams Is something that many people have been requesting for a long time. This feature allows users to collaborate with users from other teams without having to set up an entirely new team to do so.
So let’s have a look at what all the fuss Is about.
What different channel types are there?
Channels have been around since the launch of the MS Teams platform. They are an easy way to structure content and conversations in suitable categories. There are currently three types of channels that you can create within a Team.
Standard channels are publicly available channels where all communication and content will be available to the members of the corresponding team. Any content (documents, images, etc) will be stored on the underpinning SharePoint site in a subfolder of the Documents library.
Private Channels work the same way as public channels with one main exception: Access to the private channel is locked down to a subset of members of the associated team. To ensure that content access in this private channel is managed correctly Teams will automatically create a new dedicated SharePoint site to store the content for this private channel.
Shared Channels are the latest addition to the channel feature in Teams. Where in the past we had to add someone to a team before we could give them access to a channel within the team we can now create a shared channel with a unique set of users who will only have access to the content on that channel. Again, a dedicated SharePoint site will automatically be created to store the content for this shared (private) channel.
How to set up a Shared Channel
To set up a shared channel for your team you first need to make sure you are either the owner or the administrator for the team that is going to host the shared channel.
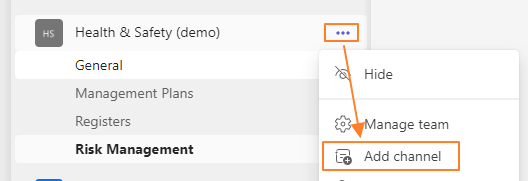
- Start by creating a channel for your team. You can use the ellipsis icon next to the team name to do so.
- Add a channel name that is meaningful for all teams that are going to share the channel and select ‘Shared’ from the Privacy drop-down box.
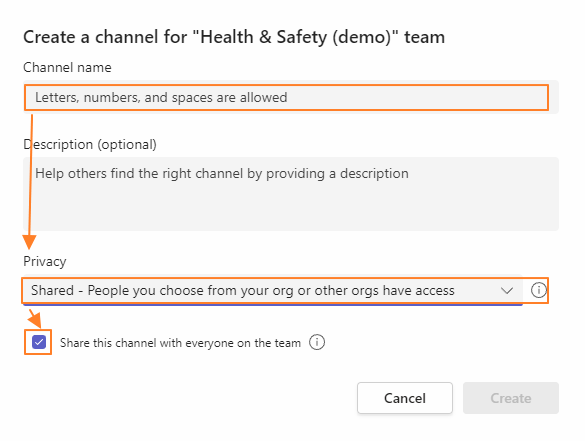
- Select the ‘Share this channel with everyone on the team’ If you want all members to have access OR leave this blank to manage this later.
- The next step is to select people you want to share with. Skip this step if you want more options (see next stage ‘How to share a channel?
You have now created a Shared Channel (note the icon behind the name) but we haven’t shared it with anyone yet.
How to share your channel?
Select the ellipsis next to the newly created channel name and select from the following options.
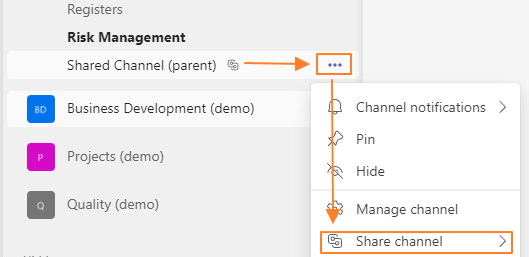
- Share ‘With People’ allows you to invite individual people inside your organisation. You can add people outside your org if cross-tenant access has been set up on both tenancies.
- Share ‘with a team’ starts the process of inviting the team’s owner with whom you want to share the channel. This process will require the other team owner to select the team and channel that they want to use for sharing your content. Once they have selected their team and channel you will receive a final approval notification to complete the connection.
- Share ‘with a team you own’ is the same structure as the above-mentioned process but is easier to set up because we don’t have to wait for the approvals that are involved if you are not the owner of the team you want to share with.
Why use shared channels?
Shared channels are a great way to cut down the number of teams required to collaborate with people in your organisation.
Where we used to have to create a new team to get the right people together in a team we can now create a shared channel instead. This makes for clearer and more intuitive information architecture that is easy to manage.
Not only does cross-collaboration between departments and project teams become easier we can also maintain a single source of truth (the shared channel) that can be shared across multiple project or departmental teams.
Some things to consider.
Although the shared channel structure is a great addition to Teams there are some things to consider when using a shared team.
Consider which Team needs to be the ‘owner’ of the shared channel. Only the team that owns the channel can manage who can share the channel. This ownership cannot be transferred once it has been established so make sure you consider where the channel needs to live.
External collaboration (sharing with other organisation’s M365 tenancy) is only supported if both tenancies have an ‘Azure AD B2B direct connect’ setup. Installing this will require further considerations about security and how this fits company policies.
Guest users are not able to be part of a shared channel so if this is a requirement you will need to consider setting up a dedicated team instead that has guest user access enabled.
Advanced features are limited on shared channels so things like analytics, planner, and tags are not supported.
Naming conventions are always a good idea but especially when considering shared channels. The channel name should be self-explanatory when it appears outside of its original team. You can change the channel name afterward if necessary but this can only be done by the owner of the shared channel.
A dedicated SharePoint site is automatically set up for each Shared Channel that you create. This is to ensure that correct user access levels are maintained when it comes to the content that is stored in these channels. You will find that the shared channel’s sites have a special icon to identify them and contain a link to their parent site.
What do we think?
Shared channels is a great improvement for Teams which gives more flexibility when developing your Teams architecture. However, it is important to be well-informed and understand the implications when choosing one option over the other.
For further information, you can visit the Microsoft Learn site or contact us for advice and support on how to make the best use of Microsoft Teams.